
Lottie Pattern Hack 1 Tutorial

Today I will show you how to make the first Lottie Pattern hack. All the hacks are quite easy, so even if you're a beginner, these should be very achievable for you!
For our first hack, we are using the dress length Lottie, with a band of color at the hem, and secret pockets sewn into the seam where the band attaches to the top half of the skirt. This can be done on either the dress or maxi versions of the Lottie. Because we don't hem the pocket in the same way as in the pattern, the shirt version will be harder to do, since the pocket will likely end up longer than the shirt itself. So if you want to try it on the shirt, be aware that the shirt will probably have to be lengthened, or the pockets shortened, in order for them to fit and not stick out below the hem of the shirt.
First step is altering the pattern. Well, the first step should be tracing off your pattern! Please don't make these kind of alterations to your tissue or PDF pattern. You want to keep that whole so you can use it again in the future. Okay, so now that you have it traced off, let's begin!
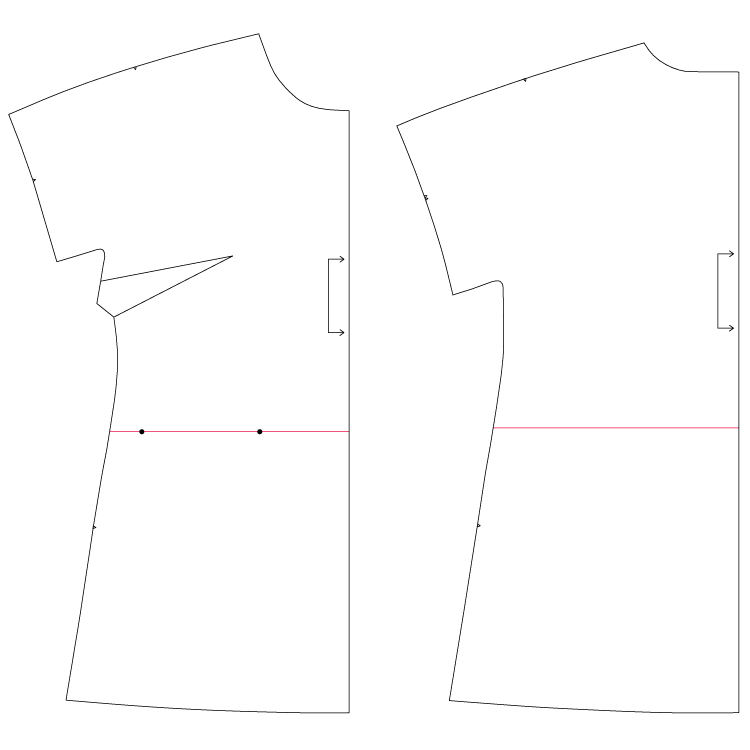
You can add a band of color anywhere you like. But since we want to include pockets in the seam, we want those to be placed on the dress where the pockets would be if we had sewn them to the front of the dress. On the dress front pattern piece, there are dots to show you where you should place the pocket for your chosen size. Draw a line from the side seam to the center front fold. Go through the dots of your size, and be sure to keep the line perfectly 90-degrees to the center front fold line.
Repeat by drawing a line across the back piece. To find where this line should be, measure the distance from the line you drew on the front piece to the hem, along the center front fold line. Repeat that distance on the back, along the center back fold line. The distance from the line to the hem along the center front fold and the center back fold should match.

Cut the front and back pattern pieces along the line you just drew. This creates the top pattern piece and the bottom pattern piece for both the front and back. However, since we will be sewing these two pieces together along this line, and we want to keep the dress the same length as it would be had we not cut it, we need to add seam allowance to the seam.
Add 5/8" to the four edges, as in the above image. Make sure to transfer the pocket placement dots to both the top and bottom front pattern pieces.

It might appear as if the pattern pieces will no longer align along the side seams. Don't be alarmed. It's just an illusion of the angle of the side seam. When you sew them together, the side seams will meet at the seam allowance as pictured above.

We also need to make one alteration to the pocket piece. We will be sewing the side and bottoms at the same 5/8" seam allowance as if we were using it as a patch pocket, so those sides are fine as is. But the top has a bunch of extra fabric for the fold, which we are not doing. We will be sewing the pocket to the dress at a 3/8" seam allowance, so that's how much we want to add to the top of the piece, just above the fold line. Simply draw a line 3/8" above the dashed fold line on the pocket, and cut away the amount above it.
As we will be sewing in-seam pockets and not patch pockets, we need four pocket pieces instead of two. If matching the fabric of the dress, cut two to match the upper portion of the dress, and two to match the lower portion of the dress. Alternatively, you can cut all four from a contrast fabric if you prefer.

To sew the pockets on, will be working entirely with the front of the dress. You can either choose to do all the tutorial steps, then sew the rest of the dress, or, you can sew everything up to the point of the pockets, then do the tutorial. I chose to do the latter, as pictured above.
In my example above, the lower back piece has been sewn to the upper back piece at the 5/8" seam allowance that I added to my altered pattern piece. The seam was then finished with my serger and the seam allowance pressed down toward the hem of the dress. I then sewed, finished, and top stitched the optional 3/4-length sleeves, sewed and finished the shoulder seams, and bound the neckline.
If it's too much to handle the whole dress while doing the pocket tutorial, just do the tutorial first, then move on with the rest of the dress.

Before sewing on the pockets, we want to finish the four edges of the pockets, as well as the edge where the pockets will be sewn on. Above you can see that I finished the lower edge of the top of the dress front, and all the sides of the pockets with my serger. No matter what method you choose, be sure not to cut away any of the fabric to keep it its original size.
You should have transferred the pocket placement dot from the pattern piece to the fabric. Because our pockets still include the seam allowance, we need to line up the inside edge of the pocket 5/8" further towards the center than the dot on the pattern piece. That dot is for the finished pocket, after it's been folded in 5/8". In the image above, you can see that there are two pink dots below the pocket on the right. The dot on the right is the original dot from the pattern piece, and the one on the left is 5/8" closer to center.
Gather the two pockets that match the top portion of the dress. Place the pockets on the dress, right sides together. Line up the inside edge of the pocket with the newly marked dot 5/8" further towards the center from the original dot. Line up the lower edges and pin in place.

Following the same instructions as above, mark the original dot, a new dot 5/8" further towards center, and pin the pockets in place right sides together for the lower portion of the dress front.

Sew the pockets to the dress as pinned, using a 3/8" seam allowance.

On the upper portion of the dress, press the pockets and the seam allowance down, towards the hem.

On the lower portion of the dress, press the pockets and the seam allowance up, away from the hem.

Place the upper and lower portions of the dress, right sides together. Line up all the edges and pin in place.

This seam will be sewn at a 5/8" seam allowance. Do yourself a favor by marking the pivot points at the four corners of each pocket. At the intersection where the pocket meets the dress, the fabric will cover your seam allowance measurements on your machine, so these markings will do you a great deal of help at those corners.
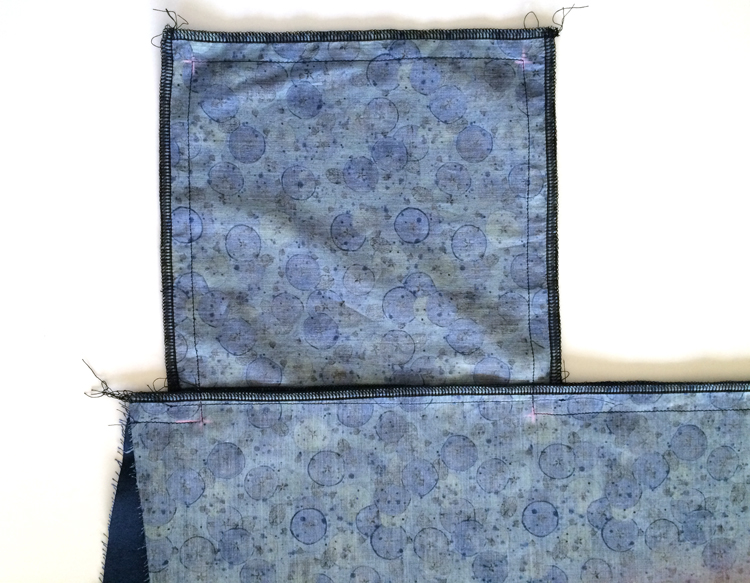
Sew from the side seam to the opposite side seam, pivoting around each pocket, until you've reached the other side. Press the pockets and the seam allowance down towards the hem of the dress.

The rest of the dress can be sewn as instructed in the pattern instructions. Note that when you sew the side seams, you want to be sure to line up the contrast band at the side seams, and keep the pockets out of the way while you sew.

And that is it! Your pockets should now look like the image above, sewn into the seam, with the pocket seam dropped slightly into the pocket itself.
Do let me know if you have any questions or need any step clarified in the comments section below. I'm happy to help!