Ellsworth Coat in Wool

In mid-December I spent a week in New York City and Michigan just before the holidays. I knew that it was going to be cold, so I thought it would be a great opportunity to try out our Ellsworth Coat pattern in a warm wool.
Since releasing the Ellsworth Coat, we have received a lot of emails asking about using wool to sew it up. The pattern envelope lists "lightweight wool" as one of the recommended fabrics, so in short, yes, absolutely you can use wool! But the word lightweight is key here. The Ellsworth was not designed for heavy wool or overly thick and bulky fabrics. There are sharp corners at the collar and center front hem, and it is hard to get a proper angle if there is too much bulk. So if you do decide to use a heavier wool or any other fabric, just keep note that you will need to make those angles more rounded, and in a deliberate manner, otherwise it will look like a mistake!

For my winter Ellsworth Coat, I used a beautiful charcoal gray wool for the outer, and a beige and black silk gingham for the lining, both picked up in November at The Fabric Store as part of my allowance for that month. I picked out the fabrics with this project in mind, and I am so thrilled with how it turned out. My wool is not what I'd call heavy, but it is absolutely thicker than lightweight. Plus, I wanted to make it warm enough for December in New York City, so I underlined it in cotton flannel.
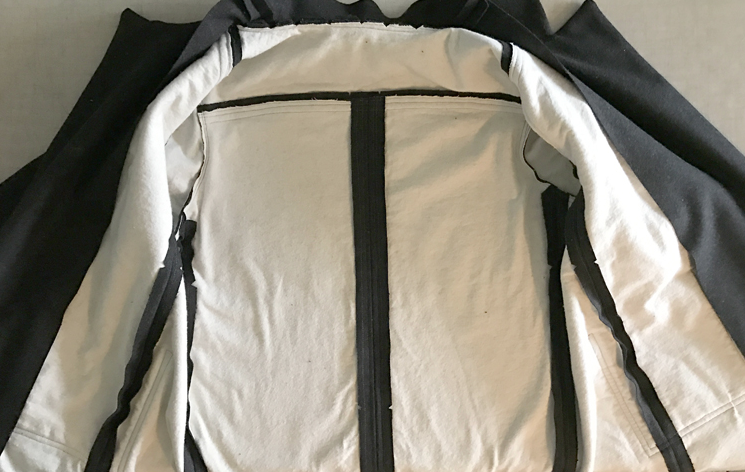
Above you can see the shell of the coat entirely sewn up, just before I put the lining in. I cut all the coat pieces in the cotton flannel (absolutely pre-wash that stuff by the way!), then sewed the flannel to the coat pieces at a 1/2" seam allowance. I did not underline the facings, and I also chose to skip the interfacing in the facings and collar since the flannel provided plenty of body to the wool. I only made three construction changes because of the heaviness of the wool and flannel. First, instead of pressing the center back seam to one side and topstitching on that side alone, I pressed the seam allowance open (you can see that above) and then topstitched on either side of the seam. This equalled out the bulk to each side instead of pushing all of it to one side. Second, the other change I did was to topstitch the center seam on the under collar. This just helped secure everything together and was largely an aesthetic choice. And lastly, instead of just hand tacking the hem to the seam allowance on the inside at the center back seam, I also tacked it at each other seam around the entire hem. The weight of the wool can pull the hem down, so this helped keep it in place perfectly.
Everything else was sewn exactly as instructed. I took great care to create nicely rounded corners on the spots mentioned above, and it really all turned out perfect. For fitting, since I was choosing a thicker fabric, and I was underlining it, I wanted to be sure that it would still fit. Because we designed Ellsworth to have a substantial amount of ease in it so you could wear it over something bulky, I didn't have to change the size of anything. That being said, could I wear this over a thick cable wool sweater? Probably not. But I could easily wear it over lots of light and medium layers.

I wanted this coat to be a classic staple in my closet that I can wear for a long time, so I kept the details pretty simple. I used very basic black round buttons, and sewed all the topstitching and button holes in a slightly lighter gray, so the stitching would be noticeable, yet match. I had planned on sewing this coat with bound buttonholes, but I decided to just do machine buttonholes after surveying other wool coats and seeing that it looked just fine. The wool doesn't fray at all, so they look pretty good as is. My machine didn't love sewing them, so they aren't exactly perfect, but then what handmade garment is?

I really love the gingham lining. It's fun and elegant in the silk, but it's also neutral and classic. It adds a perfect pop without drawing too much attention to itself. For me, the sign of a well sewn coat is the spot at the inside bottom corner where the lining and the facing meet. If that spot is sewn well, I trust the maker knew a thing or two about proper sewing. But given that I was using a moderately thick wool, and it was underlined, I wasn't sure how smooth it would go. Thankfully it went together like a dream. Perfect seam and pleat lining. Hurrah!
I know a lot of you have the Ellsworth on your list of items to sew for 2017, so I hope this shows you that it sews up just as wonderfully in wool as it does like those in the model photos, made in cotton canvas.

If you have any questions about the construction of the Ellsworth in wool, let me know in the comments below! I'm happy to help! Huge thanks to The Fabric Store for providing me with such glorious fabrics to work with. If you haven't shopped their on-line store (they ship world-wide and I usually get my packages from them in New Zealand in 2 days!!!), or their GORGEOUS shop in LA, I highly recommend both!