Emery Dress Sewalong: Pockets, Skirt, & Gathering
Today in the Emery Dress Sewalong, things really start to take shape, as we create the skirt and sew it to our bodice. And though nothing else is done, we end the day with something that looks very much like a dress! Such an exciting moment! So let’s get right to it!
ATTACH POCKETS
The Emery Dress has in-seam pockets, but unlike other garments you might have sewn with in-seam pockets, these are also secured in the waist seam, which keeps them from flopping around inside your dress. I learned this technique ages ago while teaching at Sew L.A. and I love how it keeps the pockets in place.
Place one of the pockets on the skirt back, right sides together. Line up the top and notch on the pocket with the top and notch on the skirt. Repeat with the other skirt back and pocket. Pin pockets in place. Repeat those steps with the remaining two pockets and the skirt front.
For all four pockets, sew the pocket to the skirt with a scant 5/8" seam allowance. After you sew on the pockets, finish the seam for just the pocket part of the side seam. For the sewalong example, I'm using a 3-step zigzag to finish the seams, since not everyone owns a serger. However, if you want to use a serger to finish the skirt seams, that is totally fine. Simply finish around the pockets and along the skirt edges before constructing, then follow all the steps for sewing on the pockets and assembling the skirt. Because you will not be able to make the turn under the pocket with your serger very easily, it’s best to finish the edges first.
Fold the pocket open, and press both the pocket and the seam allowance away from the skirt. Repeat on all four pockets.
SEW THE SIDE SEAMS
Place the skirt backs on the skirt front, right sides together and pin in place.
To create the top of the pocket opening, sew from the waist seam to the pocket notch. This line shows where you will stitch, which is just to the side of the stitch line where you attached the pocket, and 2” down from the top.
Before sewing the side seam, extend the stitch line from the pocket to the skirt and down the seam. The shape of the corner blocks you from being able to see the seam line on the machine. This way you can follow the marks until the lines below are again visible. Once marked, sew from the top of the pocket, around the pocket, and down to the hem of the skirt.
Finish the seam as desired, and press the seam allowance and the pocket towards the skirt front. Repeat the stitching, finishing, and pressing on the other side seam.
GATHER THE SKIRT
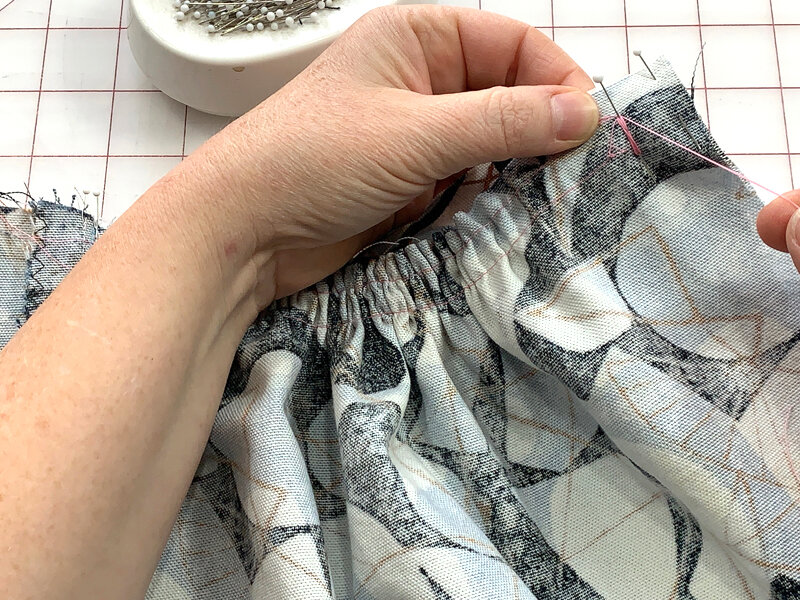
Set your machine to a long stitch length (I am using 4.0) to sew your gathering stitches. First, at the 3/8" seam allowance, sew from the center back to the side seam and stop. Sew another stitch at the 3/8" seam allowance from side seam to side seam, across the skirt front. Stitch a third stitch at 3/8" on the remaining skirt back. Repeat all of those at the 3/4” seam allowance for a second row of stitches. Be sure not to back stitch and to leave long thread tails.
I prefer to start my basting about 1” in from the center back seam so the gathers do not interfere with the zipper seam.
When sewing the gathering stitches, keep the pockets out of the way. Your stitching at the side seams will look like the image above. Stop when you get close to the seam, leave long thread tails, move the pocket out of the way, then start on the other side of the seam.
With right sides together, pin the skirt to the bodice at the center front, at the side seams, and at the center back.
Again, be sure to not pin or sew through the pockets. Leave them out of the way of all stitching and pinning for now.
At the center back seams, place a pin at the edge of the fabric, as well as at the spot where your gathering stitching begins.
At the side seams, place a pin on each side of the seam, leaving the pockets out of the way and unpinned.
Gather the skirt in four sections. First on one side of the skirt back, pull on the gathering stitches and gather the skirt fabric until it matches the width of that section of the bodice.
Lock the threads in place by wrapping them like a figure eight on either side of the gathering.
Even out the gathers and pin in place. Repeat all of those steps on the other skirt back.
Follow the above steps to gather the skirt front. The pockets should again be completely left out of the way during the gathering and pinning.
Once all the gathering is pinned, pin the pockets to the skirt front in line with the gathering.
Sew the skirt to the bodice at the 5/8" seam allowance. This should place your stitching right between the two rows of gathering stitches. When you reach each figure eight, stop just before going over it, sink your needle into the fabric, and lift your presser foot.
Remove the pin holding the figure eight in place.
Separate the threads, so they are on either side of your stitch line.
Lower the presser foot, and continue sewing on your 5/8” seam allowance, which will place you right in the middle of your gathering stitches. This will give you even and consistent gathers at your seam. Continue until you reach other other end of the seam.
After the seam is sewn, gently remove the gathering stitches. The stitches on the skirt backs should pull out easily.
On the skirt front, I like to break the gathering stitches at the center front with a seam ripper, then pull them out from there. The gathering stitches hiding under the pockets can be tough to get out, so be gentle!
Press the seam allowance up toward the bodice. The seam allowance will be hidden with the lining, but if you have fabric that frays easily, or if you are choosing not to line your dress, take a moment to finish the seam allowance along the waist seam in your preferred manner.
And that is it for today! Pretty much every student I’ve ever taught how to sew the Emery Dress likes to try it on at this point. That is obviously totally okay, but as always, be careful not to stretch the neckline out in your excitement!
And of course, let me know if you have any questions at all or need anything clarified. I’m happy to help! Next up, we put in the zipper and the lining! Yay!


