Emery Dress Sewalong: Lengthen, Shorten, & Blend Sizes
In today’s installment of the Emery Dress Sewalong, we are going to discuss sizing and simple pattern alterations. But before we make any changes, I always suggest that you sew a muslin to see what changes you need to make to the pattern first. If you start changing things right out of the envelope, you are 100% guessing, and sometimes making more work for yourself than is necessary! So before you get ahead of yourself, take your measurements, sew up a muslin in the closest size, and then see what needs done.
MEASURE YOUR BODY
The measurements we need for the Emery Dress are the full bust, upper bust, natural waist, and hip. I also suggest you measure your bicep circumference, the shoulder to waist distance, and the length of the skirt.
When taking your body’s measurements, it’s best done in supportive underwear, and if you have a friend to assist, that will help too. Use a flexible fiberglass tape measure, stand up, and if at all possible, keep your arms down and your head up in a natural position. This will give you the most accurate numbers.
For the bust, measure with the tape measure straight across your back and around the fullest part of the bust. For the upper bust, the tape measure should be above your bust, slightly under your arm, and again, straight across your back.
The waist measurement is at your natural waist, where you crease when you bend to the side, very close to your belly button. To check the distance from shoulder to waist, measure from the back of the neck down to the natural waist. The hip isn’t terribly crucial for the Emery Dress, since it has such a full skirt, but it’s good practice to do it every time you sew a garment. Measure around the fullest part of your lower half, around your butt, hips, and lower stomach.
The distance from the natural waist to the hem should be checked by simply putting the tape measure at the waist, then checking where it falls on the body. Remember, if you bend down to see where it lands, you’re moving the tape measure! So if you’re doing this alone, stand in front of a full-length mirror to check the length. And lastly, wrap the tape measure around your bicep to check that against the pattern to make sure it will fit as desired.
MAKING ALTERATIONS
Remember a few basic guidelines when deciding to make alterations to your pattern pieces:
Trace off your pattern - after you’ve either paid to have a printed copy shipped to you, or you did the hard work of taping the digital version together, do yourself a favor and leave it alone! Take the extra time to trace off the pattern pieces onto Swedish tracing paper so you can go back to the original whenever you need to. Your body is going to forever change, so this way you can make it again and again as many times as you like, and change the size every time if you decide!
Changes create a domino effect - remember that if you decide to lengthen or shorten the Bodice Front, you will also need to follow suit and do the same on the Bodice Back. If you decide to blend from a size 8 at the arm scye to a size 10 at the waist on the Bodice Front, not only do you need to do the same on the Bodice Back, but you also need to make sure you are cutting the Skirt Front and the Skirt Back at size 10! When all else fails, follow your lines to make sure anything that is sewn together is cut at the same size or has received the same alteration.
LENGTHEN
The bodice front and back are lengthened slightly different, since one is cut on the fold, and one is not. If after measuring your body and sewing up a muslin you find that you need to lengthen the bodice, follow along below to make this very simple alteration.
Bodice Front - Lengthen On the Fold
1. Cut or trace off the piece in your desired size.
2. Cut along the Lengthen/Shorten line.
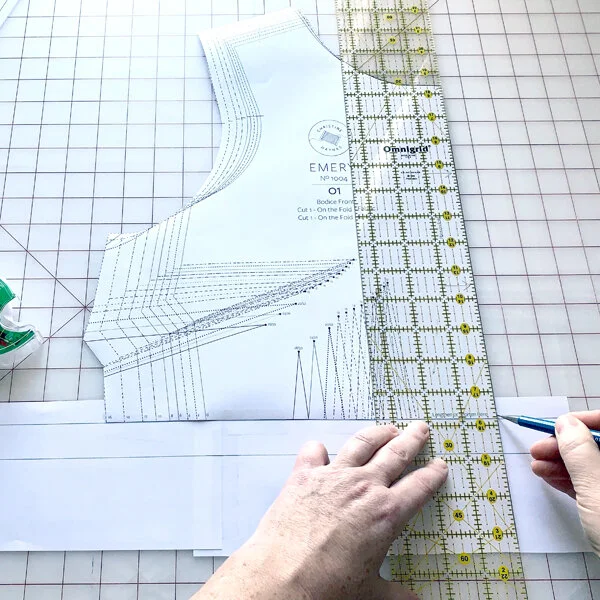
3. Use scrap paper (tape pieces together if necessary) and draw a straight line. Draw a second line below the first, the distance you want to lengthen. For this example, I am lengthening the bodice front 1”.
4. Tape the upper portion of the bodice front along the upper line.
5. Use a ruler and fine point pencil to extend the fold line.
6. Line up the right side of the lower portion of the bodice front on the fold line, and line up the upper edge with the lower line so it is now 1” below the upper portion. Tape in place.
7. Trim off the extra paper along the fold line.
8. Redraw the dart lines by connecting the apex to where the darts start at the bottom of the bodice front. These are slightly reshaped due to the extra 1” we added in.
9. Smooth the side seam and trim off excess paper.
10. And finished! Remember to lengthen any corresponding pieces so they all match.
Bodice Back - Lengthen On a Grainline
Cut or trace off the piece in your desired size.
2. Extend the Grainline so it drops below the Lengthen/Shorten line.
3. Cut along the Lengthen/Shorten line.
4. Use scrap paper (tape pieces together if necessary) and draw a straight line. Draw a second line below the first, the distance you want to lengthen. For this example, I am lengthening the bodice back 1”.
5. Tape the upper portion of the bodice back along the upper line.
6. Use a ruler and fine point pencil to extend the Grainline.
7. Line up the lower portion of the bodice back so the Grainline markings meet. Line up the upper edge with the lower line so it is now 1” below the upper portion. Tape in place.
8. On this example, the angle of the right side needs extra paper above the 1” extension to create a smooth side. Tape scrap paper to the area if necessary.
9. Smooth the side seam and trim off excess paper. Repeat on the center back seam.
10. Redraw the dart lines by connecting the apex to where the darts start at the bottom of the bodice back. These are slightly reshaped due to the extra 1” we added in.
11. And finished! Remember to lengthen any corresponding pieces so they all match.
Skirt Front, Skirt Back, + Sleeves
The Skirt Front and Skirt Back pieces do not have Lengthen/Shorten lines marked, but they can be lengthened or shortened simply by making a line about half way down the skirt piece. The Sleeves can be cut at the Short Sleeve line to lengthen or shorten.
To lengthen the Skirt Front, follow the steps above as written for lengthening the Bodice Front, as they are both cut on the fold. Omit the step about redrawing the darts, otherwise do it as directed.
To lengthen the Skirt Back or the Sleeves, follow all the steps above as written for the Bodice Back, as they are all cut on a Grainline. Again, omit the step about redrawing the darts, but otherwise do as directed.
SHORTEN
All pattern pieces are shortened exactly the same despite some being cut on the fold, and some cut on a Grainline. If after measuring your body and sewing up a muslin you find that you need to shorten anything, follow along below to make this very simple alteration. For the example below, I am using the Bodice Back piece.
Cut or trace off the piece in your desired size.
2. Draw a line above the Lengthen/Shorten line, the distance you want to shorten. For this example, I am shortening the bodice back 1”.
3. Fold along the Lengthen/Shorten line.
4. Bring the fold up to the line you drew in step 2 and tape in place.
5. If your piece has darts, redraw the dart lines by connecting the apex to where the darts start at the bottom of the pattern piece. These are slightly reshaped due to the extra 1” we removed.
6. On this example, the angle of the right side needs extra paper above the 1” reduction to create a smooth side. Tape scrap paper to the area if necessary.
7. Smooth the side seam and trim off excess paper. Repeat on the other side if necessary. And that’s it! Remember to shorten any corresponding pieces so they all match.
BLEND SIZES
The most common pattern alteration is blending between sizes. Rarely does anyone fall into one size range. Luckily this is an incredibly simple alteration! For the first example below, I am using the Skirt Front to show you how to simply blend from one size to the next. After that, I show you how to make this same alteration on a seam with a dart, which is still very simple, but requires a few additional steps.
Skirt Front - Blend Without a Dart
Cut or trace off the piece in your desired size along all the edges except for the one you want to widen. Cut that edge to the larger size.
2. Using a ruler and fine point pencil, draw a line from the smaller to the larger size, blending in a smooth transition. Trim off the excess for a blended pattern piece. That’s it! Super easy alteration!
Bodice Front - Blend With a Dart
1. Cut or trace off the piece in your desired size along all the edges except for the one you want to widen. Cut that edge to the larger size.
2. Fold the pattern piece along the stitch line of the lower dart leg, from the edge to the apex.
3. Bring the fold up to the upper dart leg, placing the volume of the dart behind, as it would be if it were sewn. Tape the dart to hold it in place.
4. Using a ruler and fine point pencil, draw a line from the smaller to the larger size. For this example, I am connecting the bottom of the Bodice Front to the arm scye, over the fold of the dart.
5. Trim along the line drawn in the previous step, which will create a new dart shape to correspond to the new side seam.
6. Unfold the dart and redraw the dart lines from the apex to the side seam.


